
Reading Time: 6 minutes read
Digital photos are wonderful! They represent our favourite memories and experiences. Unfortunately, digital photos can also take up quite a bit of room on our devices. So you may wish to reduce the photo file size (or compress) certain images to free up space.
How to compress photos
Compressing a photo is simple. The methods will differ slightly depending on which images you wish to reduce in size, what you intend to use the photos for, the type of device you have and what type of software you’re using to compress the images.
We’ll discuss and explain the different ways to reduce photo file size in this guide with some easy-to-follow steps.
How to reduce photo size online
Digital photos are made up of pixels that are stored on your device or computer. Some images consist of more pixels than others. There are some types of digital images that are comprised of millions of pixels making them extremely large. These images take up a lot of storage space, which can pose a problem if you try to email or transfer them to another device or computer.
The solution is to compress the image, which reduces the size of the photo without having to resize the image. Find out how to compress photos online using these free apps.
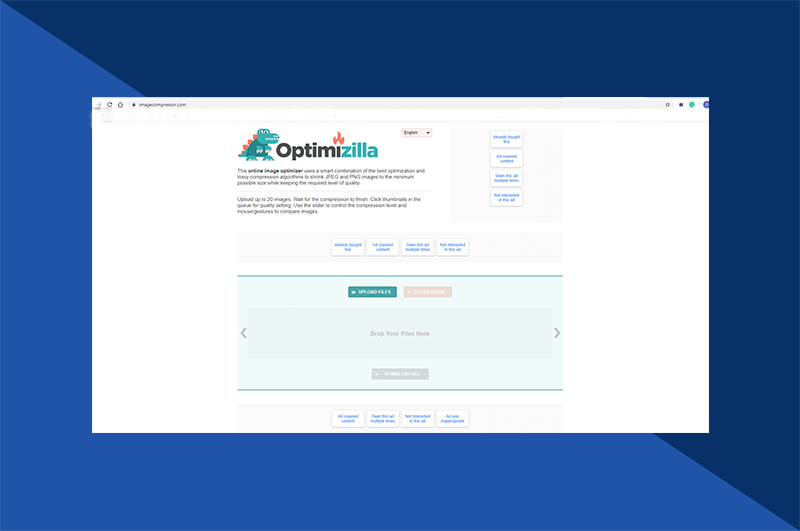
The Optimizilla “Image Compressor”
Optimizilla is a free online tool that can compress both JPEG and PNG images. The before and after slider feature allows you to view the quality of the compressed version before you continue with the compression. You can upload 20 images at a time. Unfortunately, Optimizilla doesn’t support PDF files or conversions.
TinyPNG
TinyPNG is a tried and tested image optimization tool that can compress both JPEG and PNG images. TinyPGN uses the smart lossy compression technique to reduce file size. You can upload up to 20 images at a time (or 100 per month). Image sizes cannot exceed 5MB.
Reducing a photo online
If you choose to reduce photo size using the Optimizilla, you can follow these simple steps:
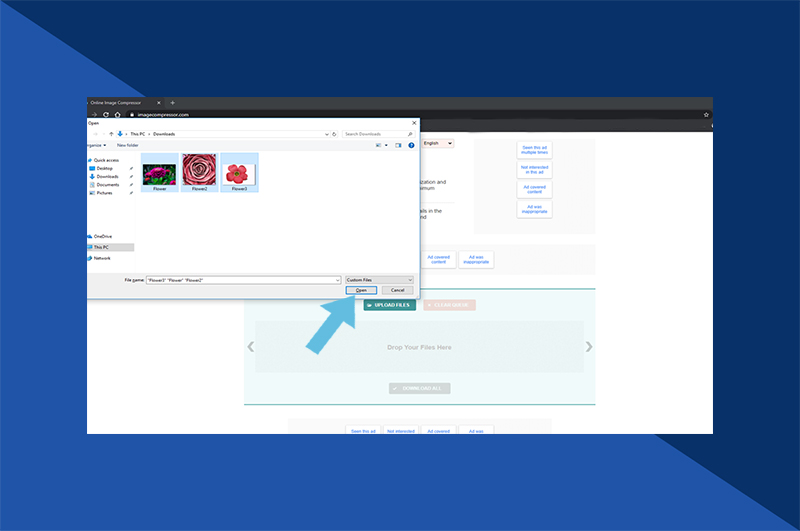
1. Open the ‘Image Compressor’ in your computer’s browser. This can be accessed at https://imagecompressor.com/. Click on ‘Upload files’ at the top of the page. This will prompt a File Explorer window to open.
2. Select the images you wish to upload by holding down the ‘Control’ key and clicking on each photo. You can upload 20 images at a time.

3. Select ‘Open’ on the bottom right-hand corner of the window to upload the images to the Optimizilla website. Select a photo for decompression by clicking on the list of thumbnails.
4. You can scroll down to view the uncompressed version on the left-hand side and the compressed version on the right-hand side. Drag the quality slider up or down on the right to increase or decrease the compression. Select ‘Apply’ when ready.
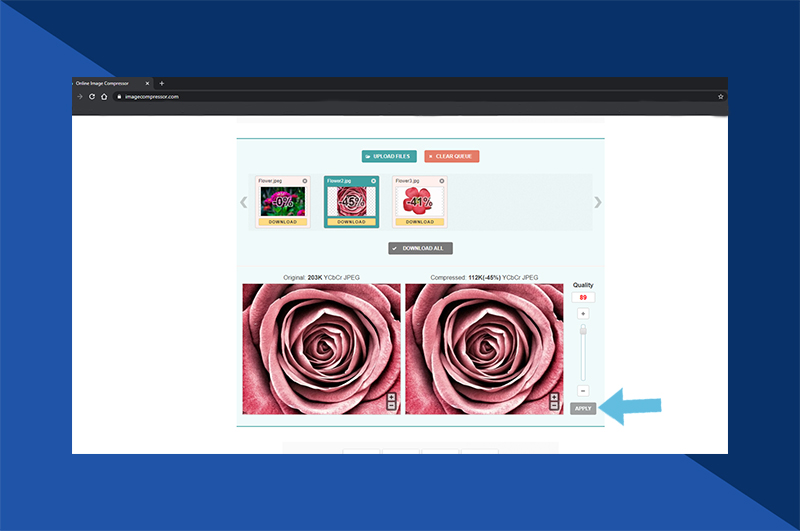
5. Select ‘Download All’ at the top of the page. This creates a ZIP folder of your compressed images,which you can download onto your PC.
How to reduce a photo file size on a Mac
If you’re working with a Mac and would like to learn how to reduce the size of a photo, you can follow these steps:
1. Select the image you wish to compress. Select ‘File’ in the upper left-hand corner of the screen. A drop-down menu will appear. Select the ‘Open With’ option, which will prompt a pop-out menu. Select ‘Preview.’
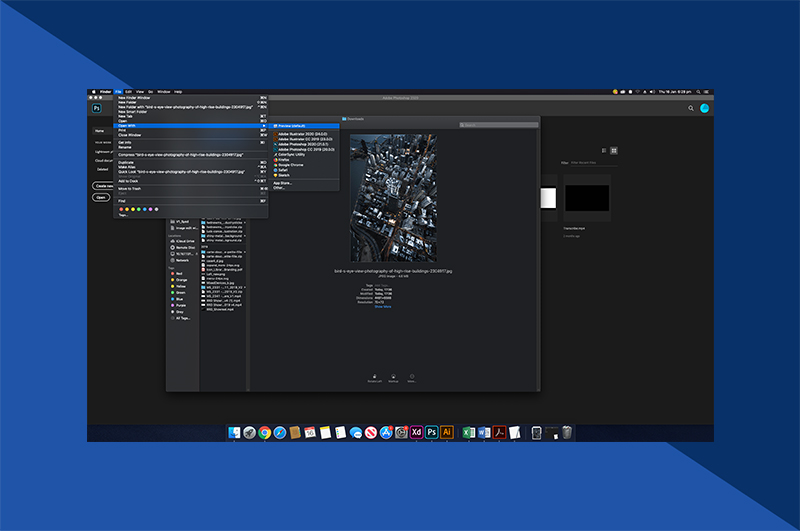
2. Your selected image will then appear in ‘Preview’ mode. Select ‘File’ in the upper left-hand side of your screen. A drop-down menu will appear. Select ‘Export.’ A new window will appear.

3. Name your photo in the field at the top of the window. Save to a location by selecting ‘Where’ on the drop-down menu (to your Desktop, for example).
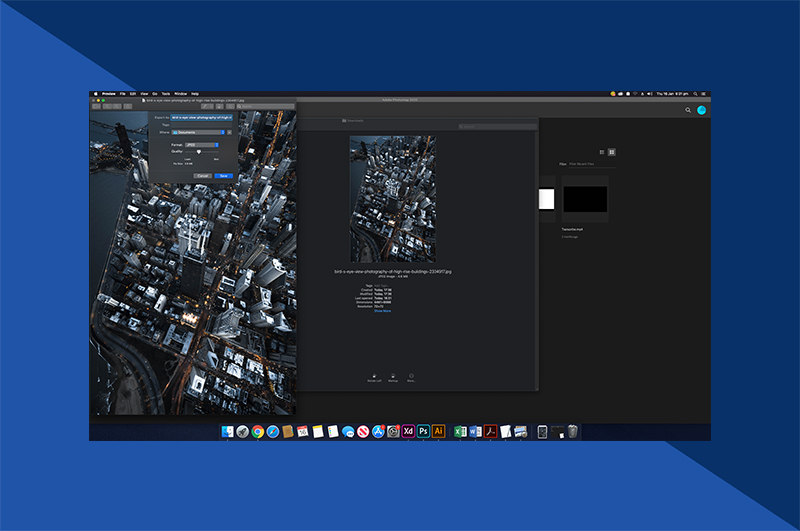
4. If necessary, change the image to a JPEG format by selecting this option in the box on the right of the ‘Format’ heading. Then, adjust the compression quality by clicking and dragging the slider to the left. Select ‘Save’ at the bottom right-hand side to save to the selected folder.
How to reduce photo file size on a Windows PC
If you’re working with a Windows PC and would like to know how to make a photo smaller, you can follow these steps:
1. Once you’ve located the image you wish to compress, open the photo in ‘Photos.’ Select the ‘…’ option on the top right-hand side of the Photo’s Window. A drop-down menu will appear.

2. Select ‘Resize’ to enable a pop-up menu. Select a size. The options are: S (small) or M (medium). Once you click on a size, a ‘Save As’ window will open.
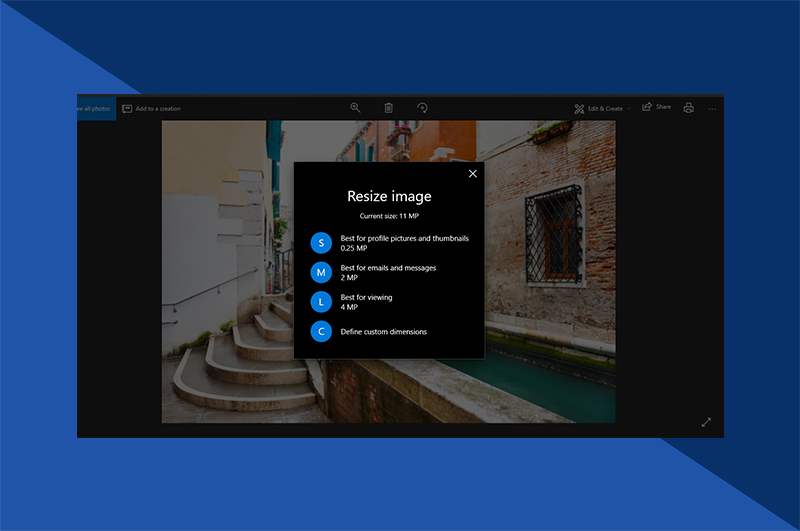
3. Name your photo in the ‘File Name’ field. Select a file location by clicking on a location in the left-hand sidebar. Select ‘Save’ at the bottom right-hand corner of the window. The compressed file will be saved to this location.

Use Motif’s photobook app for bespoke photo creations
When you’re finished, don’t leave your beautiful photographs hidden on your device. Instead, download Motif’s premier photobook app and create magical memories with your favorite images. Our easy-to-use app is suitable for both macOS and iOS devices and lets you customize each special project. Choose from a wide variety of top-quality colors, patterns and design templates to suit your individual style or project. The perfect gift for friends and family or to commemorate a special occasion or holiday.